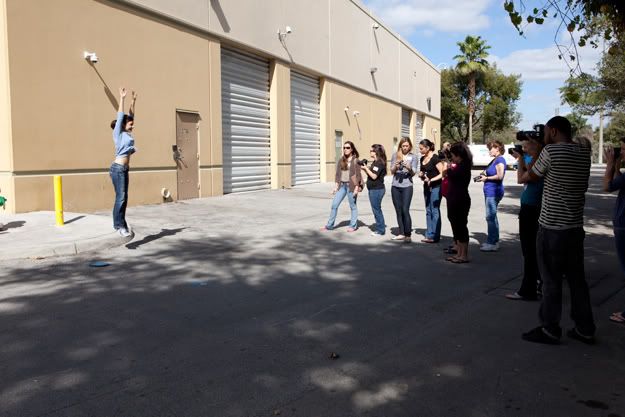
It's that time again. TYE Studios will be giving their Studio Tour with TYE Studios' Photographer, Julius Gregorio, and Broward County Schools Photographer/Instructor, Jeremiah Jenner. Students of Jeremiah's Class will be given a quick tour of what a professional photo studio offers, along with the benefits on why a photographer would choose to shoot indoor/outdoor with professional photo equipment. The tours are schedule for April 23, 25, and 26 at 6 p.m. - 8 p.m. If you would like to join any of the tours, please RSVP ahead of time. You can email or call us anytime. E. info@tyestudios.com , T. 954.327.3447
We look forward to seeing you at the studio next week. For those who have always wanted to come to the studio and see the space and equipment, this would be the best opportunity to do so. And best yet, it's NO CHARGE.
#photostudio . #fortlauderdale . #tour . #instruction . #schools
Monday, April 16, 2012
Sunday, April 15, 2012
TYE Photographer Profiles
We would like to mention that TYE Studios is not only a Photo/Video Rental Studio, but also a production house with some of the most talented artist in South Florida. And with each week, I will be introducing to you each photographer and samples of their work on the blog.
This week, we introduce Photographer, Donna Peplin. Along with her title as Owner of TYE Studios, she is also a photographer that specializes in Babies and Dogs. Recently she just launched both of her sites with links to them which can be found below.
www.i-shoot-dogs.com
www.belliesnbabies.net
#babies . #dogs . #studio . #photography . #photorental
Tuesday, April 10, 2012
Summer is here (almost)
The official spring season might have started a few weeks back, but SUMMER in South Florida is definitely here. From the needed sunblock, high humidity, and afternoon showers, South Florida summer weather is here to stay for the next few months. And with that said, TYE Studios would like to invite you "INDOORS" to shoot at our main Studio A, where the weather is a cool 72 degrees. No need to worry about rain delays or rescheduling, or contrasty shadows to overcast skies, our Studio A will give you plenty of shooting arrangements to keep you busy for a complete day (or several). And that is why, for a limited time, we are offering a 20% summer discount to our STUDIO A space, for Half or Full Day rentals only, (8 a.m. - 6 p.m.)
So stay away from the outdoors and step inside where the temperature is just right. We welcome those who would like to take a tour of our studios, to come and visit when possible. If after hours, just give us a call and we can accommodate a tour at your convenience. We look forward to seeing you at TYE this summer, and remember, don't forget the sunblock. =)
So stay away from the outdoors and step inside where the temperature is just right. We welcome those who would like to take a tour of our studios, to come and visit when possible. If after hours, just give us a call and we can accommodate a tour at your convenience. We look forward to seeing you at TYE this summer, and remember, don't forget the sunblock. =)
Monday, February 27, 2012
Marian Call 2012
Last years performance was, how do we state it, "AMAZING". Marian Call, will be back at TYE Studios for another South Florida performance. We welcome all music lovers to come and enjoy an evening of great music and good times. I hope to see you all there tomorrow night.
For samples of her music, please visit the following link:
http://mariancall.bandcamp.com/album/something-fierce

For samples of her music, please visit the following link:
http://mariancall.bandcamp.com/album/something-fierce

Sunday, February 5, 2012
Photoshop Actions
Information provided by: www.lightstalking.com.
I am sure, like me, many of you spend hours and hours sitting at Photoshop carrying out the same repetitive tasks on countless photographs, be it resizing, converting formats or applying the same color tweaks to a large batch. Well you may or may not have heard of Photoshop Actions, an often under used little gem hidden away in the Windows section of the main Photoshop menu. When activated it will appear amongst the pallets section, generally on the right hand side of the Photoshop window.
So what does it do? Well put simply, when activated it records the inputs that you are making to your image and saves them, allowing you automatically apply the same inputs to further images. The actions are very flexible, you can create an action to carry out a simple repetitive task in the middle of more complicated manipulation or you can create one to carry out all the operations in one fell swoop and then rename the image and change it’s format.
I will give you a very simple example one how to create an action and then run it on a batch of images. In this action we will open a JPG file, resize it suitable for web and save it as a PNG file.
First open a JPG of your choice. If the actions palette is not already open, open it from the Photoshop menu WINDOW – ACTIONS.
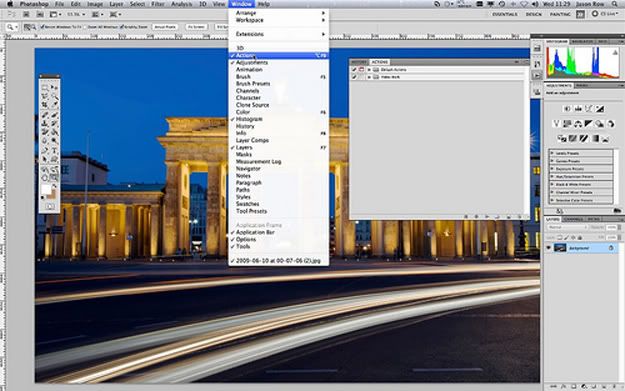
The actions palette should now be visible on the right side of the Photoshop screen. If you have not used actions before you will see a folder called default actions at the top. This is a set of actions provided with photoshop.
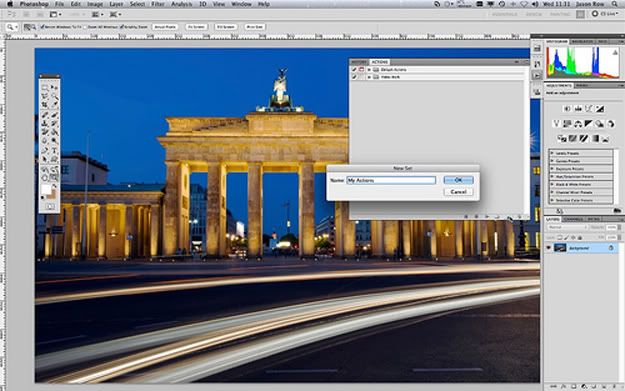
You can create your own library of actions and assign them to different folders called sets. Lets create a new set called My Actions. Click the new set icon on the bottom of the actions palette and enter the name.
Now select that set in the main window and click the create new action icon at the bottom. Give your action a name, in this case Web Size.
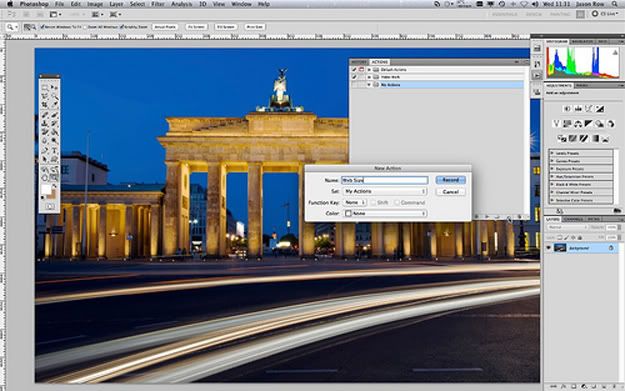
With your image open and the Web Size action selected click the record button. We are now recording our Photoshop moves. From the Photoshop menu, select IMAGE – IMAGE SIZE. Set the resolution to 72 pixels per inch and make sure Constrain Proportions is checked. Enter a new height or width size, in our case a width of 800 pixels. Click ok when everything is set.
Now we will save the image so click FILE – SAVE AS rename the file as required and select PNG from the File Type drop down. Click SAVE.
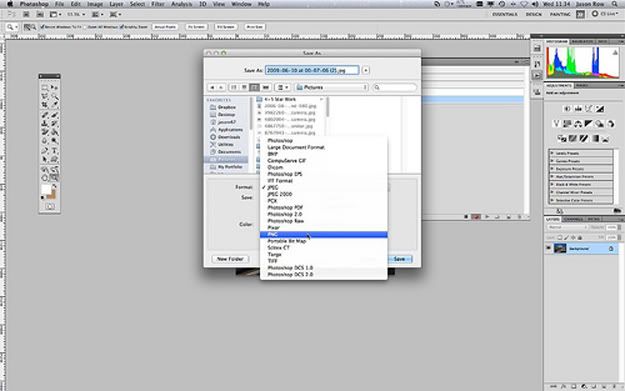
This next bit is important, we will now close the image from FILE – CLOSE. If you do not do this, when you are running a batch of images, they will all remain open, slowing down your computer.
With the actions finished, we must now stop the recording. Click the square box next to the record icon, you action is now saved.
We can run the action two different ways, from Adobe Bridge where you can define which images to batch or from inside Photoshop itself where you can batch an entire folder of images. We will do the latter.
From the Photoshop menu, select FILE – AUTOMATE – BATCH. At the top you will see the Set drop down menu, choose MY ACTIONS. You can now select the WEB SIZE action from the next drop down. For source select FOLDER and from the CHOOSE icon select the folder of images you wish to batch.
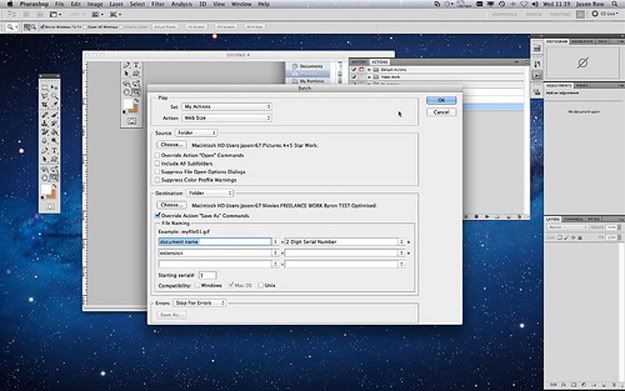
Under DESTINATION, select FOLDER and choose a suitable folder to send the images to.
Check the “Override Action Save As Command” tick box
Next you have options for renaming, I usually create a new name using the Document dropdown box then add a 2 or 3 digit sequence number in the next drop down, finally in the third dropdown select extension. Set your serial number to 1 and click ok.
You will now see your images wiz past in Photoshop as the program applies the action and saves the file and you can make a cup of tea and put your feet up knowing you have saved hours of work.
As mentioned this is a very simple example but with a little practice you will find yourself creating more advanced actions and drinking more tea.
Jason Row is a British born travel photographer now living in Ukraine. You can follow him on Facebook or visit his site, The Odessa Files. He also maintains a blog chronicling his exploits as an Expat in the former Soviet Union.
I am sure, like me, many of you spend hours and hours sitting at Photoshop carrying out the same repetitive tasks on countless photographs, be it resizing, converting formats or applying the same color tweaks to a large batch. Well you may or may not have heard of Photoshop Actions, an often under used little gem hidden away in the Windows section of the main Photoshop menu. When activated it will appear amongst the pallets section, generally on the right hand side of the Photoshop window.
So what does it do? Well put simply, when activated it records the inputs that you are making to your image and saves them, allowing you automatically apply the same inputs to further images. The actions are very flexible, you can create an action to carry out a simple repetitive task in the middle of more complicated manipulation or you can create one to carry out all the operations in one fell swoop and then rename the image and change it’s format.
I will give you a very simple example one how to create an action and then run it on a batch of images. In this action we will open a JPG file, resize it suitable for web and save it as a PNG file.
First open a JPG of your choice. If the actions palette is not already open, open it from the Photoshop menu WINDOW – ACTIONS.

The actions palette should now be visible on the right side of the Photoshop screen. If you have not used actions before you will see a folder called default actions at the top. This is a set of actions provided with photoshop.
You can create your own library of actions and assign them to different folders called sets. Lets create a new set called My Actions. Click the new set icon on the bottom of the actions palette and enter the name.

Now select that set in the main window and click the create new action icon at the bottom. Give your action a name, in this case Web Size.

With your image open and the Web Size action selected click the record button. We are now recording our Photoshop moves. From the Photoshop menu, select IMAGE – IMAGE SIZE. Set the resolution to 72 pixels per inch and make sure Constrain Proportions is checked. Enter a new height or width size, in our case a width of 800 pixels. Click ok when everything is set.
Now we will save the image so click FILE – SAVE AS rename the file as required and select PNG from the File Type drop down. Click SAVE.

This next bit is important, we will now close the image from FILE – CLOSE. If you do not do this, when you are running a batch of images, they will all remain open, slowing down your computer.
With the actions finished, we must now stop the recording. Click the square box next to the record icon, you action is now saved.
We can run the action two different ways, from Adobe Bridge where you can define which images to batch or from inside Photoshop itself where you can batch an entire folder of images. We will do the latter.
From the Photoshop menu, select FILE – AUTOMATE – BATCH. At the top you will see the Set drop down menu, choose MY ACTIONS. You can now select the WEB SIZE action from the next drop down. For source select FOLDER and from the CHOOSE icon select the folder of images you wish to batch.

Under DESTINATION, select FOLDER and choose a suitable folder to send the images to.
Check the “Override Action Save As Command” tick box
Next you have options for renaming, I usually create a new name using the Document dropdown box then add a 2 or 3 digit sequence number in the next drop down, finally in the third dropdown select extension. Set your serial number to 1 and click ok.
You will now see your images wiz past in Photoshop as the program applies the action and saves the file and you can make a cup of tea and put your feet up knowing you have saved hours of work.
As mentioned this is a very simple example but with a little practice you will find yourself creating more advanced actions and drinking more tea.
Jason Row is a British born travel photographer now living in Ukraine. You can follow him on Facebook or visit his site, The Odessa Files. He also maintains a blog chronicling his exploits as an Expat in the former Soviet Union.
Beginners Photography Class - January 2012
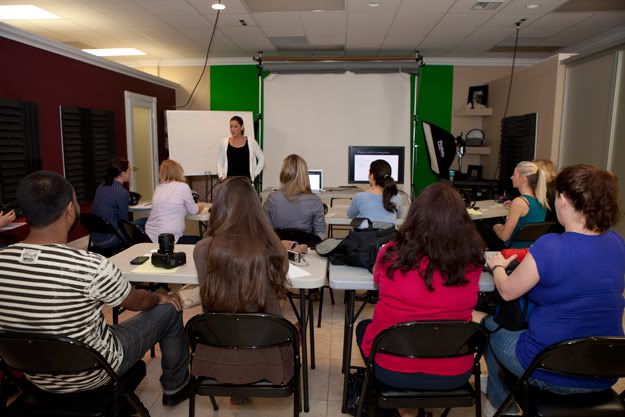
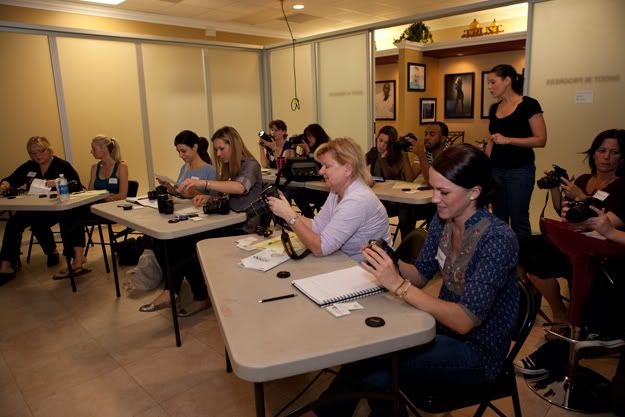
The first "Beginners Photography Class" of 2012 started off with a bang with a full class of 10 students. Two days of instruction and homework helped provide amateur and hobbyist photographers, learn more about their equipment and photography basics and theory. It is always a joy to see photographers of all levels, excited to learn more about photography and apply their newly learned knowledge to their photographic style. We hope for the next class to be as successful and look forward to seeing you all here at the next workshop at TYE.


Wednesday, January 25, 2012
Tuesday, January 17, 2012
Coke Zero and Greg Anthony
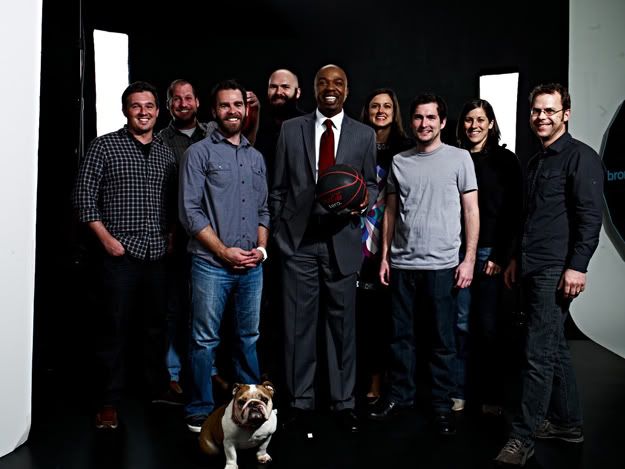
Yesterday, Studio A and B were utilized to photograph and video former NBA player and currect CBS College Sports Coverage Analyst, Greg Anthony. The out of state production team spent the whole day doing green screen and portraits of Greg for an upcoming Coke Zero ad/promotion.
Studio mascot Lucy, had the pleasure of taking photos with Greg after the completion of the day.


Studio mascot Lucy, had the pleasure of taking photos with Greg after the completion of the day.


Thursday, January 5, 2012
New Year...
...new images to create. We at TYE Studios wish everyone a happy 2012. Holidays are finally over and the photographic season is finally here. We want to let you know that we have a few new surprises at the studio. With a new addition on it way, we hope to continue to provide artists many shooting options in-studio and on location. We are focusing in 2012 to provide you with a full production team (if needed), from 1st and 2nd assistants, lighting techs, digital techs and retouchers. For more information to our complete list of services, please inquiry by contacting us via email or phone.
www.tyestudios.com
www.tyestudios.com
Subscribe to:
Comments (Atom)
.jpg)
